By Elizabeth Yeager Cross
WV Design Team
Over the past few years I have been sharing with you, my readers, the fun and fabulous design installations our team at Yeager Design and Interiors has done. We have received such wonderful feedback and almost always people follow up with questions about my own personal home. They most often say, “I bet your home is just beautiful isn’t it,” or “what is your own personal style?” First, let me tell you with two kids under five, and a full-time self-employed business, my home has often taken a back seat. It wasn’t until we moved, almost ten months ago, that I really started trying to take time and make this new home – feel like home, the way I constantly do for my clients.
Second, my own personal style is a direct lineage from my mother and our love for all things neutral with pops of color here and there – oh and of course, metallic mixed in as well. Today’s installment is on my own master bedroom. I know I’ve written to you about bedroom before and how I try to keep them tranquil, romantic, and clutter free. Here is the reality for me though. How romantic can you get when your three year old has taken up residence in your chaise lounge? In every space there are always challenges and Miss Ivery is just one of mine for this room! The design challenges for my master bedroom include:
- Three year old non-compliant occupancy
- Lots of windows
- More furniture than wall space
While this room is much bigger than the master in our previous home, it is a different shape and has a lot of windows. Windows are a giant plus, but can make it hard when you have an armoire that needs installed.
Like many of my clients, cost and shortage of time often determine what and when we are able to complete a design project. We end up compartmentalizing things into phases that help develop a plan for completion.
My phase one occurred at the same time we were moving in the rest of the house. So really, all I got done was painting the wall “my signature Yeager Grey” and throwing the furniture in. The paper accordion shades would have to be addressed at a later date, our broken nightstands would have to suffice, and our humongous armoire would have to stay put where the movers dropped it by the door.
Fast forward to the past month and the beginning of phase two which included:
- Addressing the bay window
- Moving the armoire
- Finishing touches to walls and bedding.
All I have to say is, “God bless my husband!” He always entertains my design whims when I show up in our driveway with a box truck and a “to do” list, and most importantly helps me schlep it all in the house for installation.
To finally finish out the bay window area, we removed the paper shades, installed thick ivory Roman shades and hung ecru gauzy panels on gold clean line hardware. This step was literally a game changer! The softness the fabric brought to the room was breath taking.
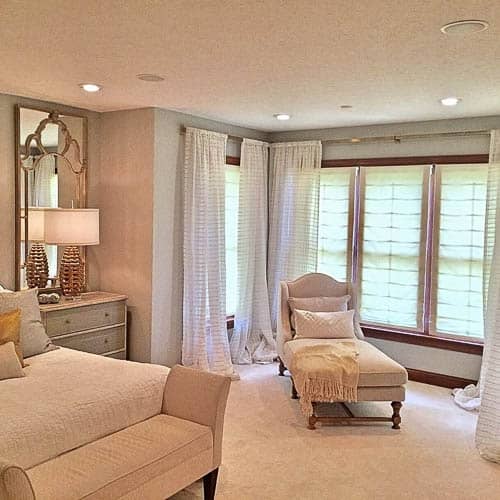
By adding window panels with a subtle texture and pattern over a solid Roman shade the room immediately seems softer and more refined.
Our second step was to move the beast of an armoire out of its current view-blocking position. I finally decided to move it to the right side of our TV wall, opposite our bed and sort of hidden behind the door to our room. The asymmetry of it all just about overwhelmed me (I know I should be able to handle this being a designer, but I can’t). To balance the weight of this new look, I decided to hang art work on the opposite side that would visually take up the space without being another large piece of furniture. And it worked!
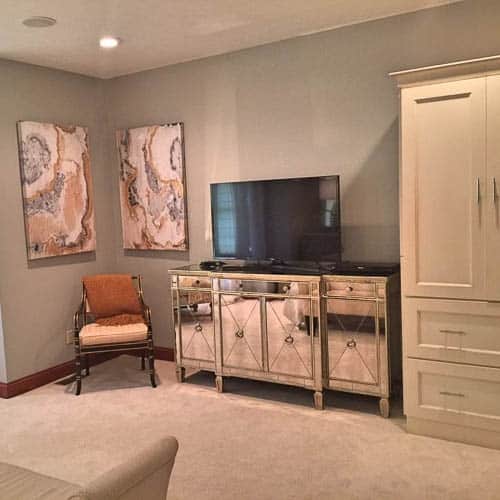
If you have problems, like I do, with things not being symmetrical, try balancing out a piece of furniture with a like size and color art piece. This will set your mind at ease and help fill the void of space.
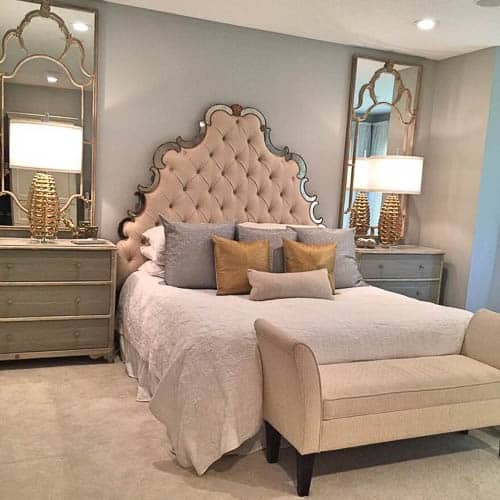
Last on my list were the finishing touches to tie the room together. I replaced the broken nightstands with warm grey and white three-drawer chests. I love how the different finish on these pieces mix with the soft whites, creams, and ivories in the rest of the room. I also chose to hang antique style carved mirrors above each piece to bring height to the room, as well as frame out our existing ornate headboard. To punch up the accessories and décor, I added gold honeycomb lamps and small meaningful accessories to each tabletop.
The Master Bedroom should feel like an escape to rest and relaxation. By paying attention to every detail this room emotes luxury, creates romance, and is the perfect retreat to escape the outside world, right in your own home.
By adding a few new silver Euro pillows to the bedding it instantly brought a bit of glam onto the scene. I don’t believe I’ll ever be able to be one of those people with expensive dry-clean only bedding. Considering the fact that just about every day my kids wipe their toothpaste mouths and their syrupy sticky fingers, on my bedding and we still have the occasional accident mishaps. I’ll just stick with my bleachable white cotton quilt, thank you!
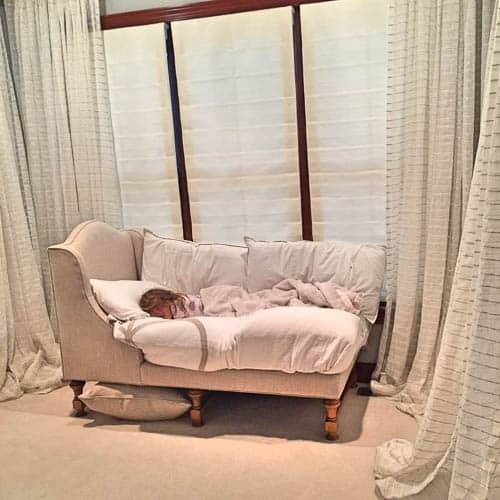
All rooms have design challenges. Mine just so happens to be a three year old who refuses to sleep more than 15 feet away from her mother. At least we got one picture of the room pictured perfectly!
All in all, I am over the top please with my phase two work on our master bedroom. I know that none of the furniture matches but that is, I think, my favorite part. The mixture of painted wood, mirrors, and soft fabrics make me feel relaxed and at home. It truly is a luxurious and romantic room. Now all I have to do to reach complete design perfection is evict a demanding toddler! Buts that’s another story for another day! Happy summer to everyone and I hope you get time to work on some of your design wish lists as well!
– To read the full article: http://www.wvgazettemail.com/life-home/20170622/wv-design-team-mastering-the-master-bedroom